Showing posts with label instructions. Show all posts

Sensor Dust Cleaning with Giottos Rocket Blower

2008-09-30
I want to document how I clean sensor dust with Rocket Bower from Giottos which I find quite capable for most of my needs.

Giottos Rocket Blower:

Not all blowers are alike. I have been using this package from Amazon: Giottos Rocket Blower with description as Giottos Optical Cleaning Kit with Rocket Air Blaster, Brush & Liquid.: Electronics


Precautions:
  • Always turn camera off -- during lens change. I always have the camera off when I change lens as static charge attracts dust. If you use blower without mirror lock up, also turn the camera off as an opened chamber with electric power will also attract dust.

  • Apply blower from below -- upon mirror up, I tilt the body in an angle, and blow from below with air puffing upward to blow dust out of the sensor chamber.

  • Leave blower at a distance -- I keep my blower at 1 to 2 inch distance away from the camera housing. This is to avoid blower tip hitting the inner housing and allow the dust to have more room to circulate out of the chamber.

  • Never touch the inner housing -- whatever I do, I pay attention to avoid contact with the inner housing of the sensor chamber and mirror housing. You can look but no touching.

  • Don't leave body facing upwards -- dust falls down with gravity

Air Blower operation:

I use two of my gadgets to demonstrate how I clean sensor dust with the Giottos Rocket Blower.

giottos rocket blower & rei ultrapod ii tripod

And as show in the below picture, I use my mini-tripod from REI to show I mount the camera at an angle, roughly like 45 degree and position the blower from down below. Always give the blower a few puffs to push off dust in blower before the actual operation on the sensor.


giottos rocket blower & rei ultrapod ii tripod


giottos rocket blower & rei ultrapod ii tripod

In Real Practice:

I have my battery grip mounted which makes it easier for me to hold the camera in one hand and tilt the camera at an angle facing down and blow air from below similar to the picture above where I used the Ultrapod II tripod as my other hand.


YouTube Video Demo

I found this video helpful and I want to include this with this blog post for reference. In the video, the author mounted the camera facing downwards and this will be more effective. But if you are on the road, try your best to tilt at a safe angle.


Related:


Setup with Pentax M42 mount lens

2007-09-21
I want to drop down what I do when I work with Pentacon 50mm f/1.8, which is my first M42 mount lens. First, you need to purchase a M42 adapter such as the Bowers M42 adapter from BHPhoto. Please refer to previous post on Pentax M42 adapters for detailed information


Bowers m42 adapter for K mount

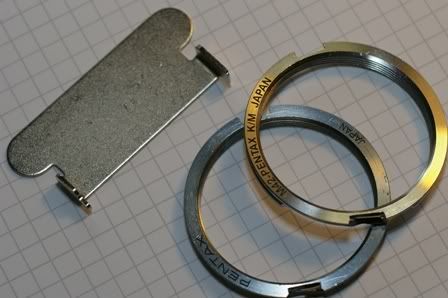
Genuine m42 and general bowers adapterLeft to Right
1. Tool for 3rd party adapter
2. Genuine Pentax adapter not needing tool
3. General adapter such as Bowers from BHPhoto

For installation of m42 adapter, please refer to the following document
Two custom settings are needed to change in order to get AF confirmation as well as metering with the manual lens.
    • default is 'Not Available, you need to turn this to 'Available' so that AF confirmation can be obtained in M42 lens

  • Using Aperture Ring
    • default is 'Prohibited' and you need to turn this to 'Allowed' so that aperture can be metered in stopping down with the M42 lens.
On my Pentacon 50mm f/1.8, the aperture ring bears both the marking for 'M' and 'A'. For most of my tests, I put the marking on 'M' setting as I meter the lens stopped down instead of metering it wide open as in the DA lens.

Upon turning on the camera with a M42 lens mounted, a focal length confirmation is shown on the screen, and one needs to adjust the value to the closest focal length. This is important for the SR calculation to work. If you have a manual zoom lens, set the value to the closest value that you are likely to use. If you change your mind to use a wider or longer zoom, you can always turn off the camera and reset it upon the next power on. Or one can use 'Menu', followed by Up arrow to get to the SR focal length selection setting to reset the focal length. I personally use a setting lower or equal to the zoom length to avoid unnecessary SR.

Update with warning:


Related Links & Posts:


About

Welcome to Hin's Photo Corner, this is my learning blog on photography, blogging and advertising. And I hope you enjoy your visit. For contact, please comment in blog post or email me directly hintheman at gmail.com.


B&H Best Deals

Statcounter